Information
This article will show you how to import Windows Calendar from Vista into Windows 7, and to enable using Windows Calendar from the toolbar button in Windows Mail in Windows 7 if you also imported it.
There is no Windows Calendar feature included in Windows 7 by default.
Warning
If running 64bit Windows 7 it is essential to import Windows Calendar from a 64bit Vista installation into the normal 64bit program files. And the same for 32 to 32bit.
Step 1
· In Vista open: Program Files --> Windows Calendar.
· Copy the entire Windows Calendar folder.
· Paste this folder into Program files in Windows 7.
· Still in program files, open the pasted Windows Calendar folder --> Right click: WinCal --> Send to desktop as shortcut.
· If desired create a Windows Calendar shortcut in Start menu programs as follows:
· Choose View options to show hidden folders.
· Open: Computer --> C: Drive --> Program Data --> Microsoft --> Windows --> Start Menu --> Programs.
· Paste copy of WinCal shortcut into Start Menu Programs & re-name to: Windows Calendar.
Step 2
· In Vista open: Control Panel --> Administrative Tools --> Task Scheduler.
· In left window pane expand tree for: Task Scheduler Library --> Microsoft --> Windows.
· Scroll down Windows tree to: WindowsCalendar --> Click to highlight --> In right window pane click: Export.
· It opens a file named "Reminders - 'Your User name'.XML"
· Save this file to desk top or storage folder.
Step 3
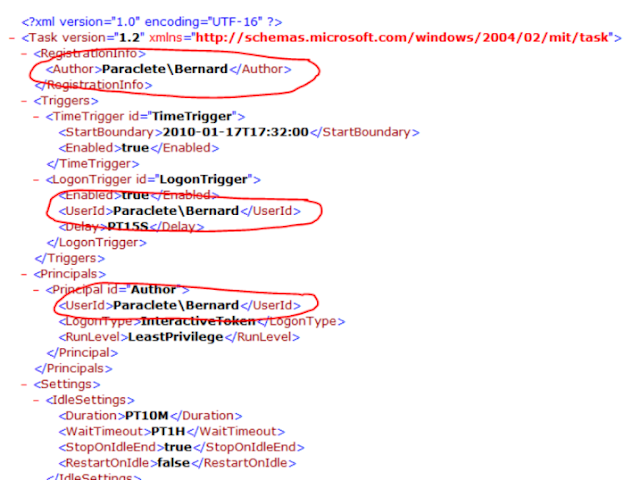
· Open saved "Reminders.XML" file with Notepad, but do not set Notepad as default opener.
· Wherever your user name and computer name appear, it must be changed to exactly match your user name and computer name in Windows 7. To find Computer name, right click: Computer --> Properties.
· See following pic to find where changes need to be made. Note: This image shows "Reminder file" opened in normal view, but it must be opened with Notepad to make changes. Click image to enlarge.
· For example, "Paraclete/Bernard" becomes "Lizzi's Computer/Lizzi".
· Once changes are made click: Save. Changes will be saved as XML file.
Step 4
· In Windows 7 open: Control Panel --> Administrative Tools --> Task Scheduler.
· In left window pane expand tree for: Task Scheduler Library --> Microsoft --> Windows.
· Click: Windows to highlight --> Right click again & select: New Folder.
· Name new folder exactly as follows: WindowsCalendar with no spaces.
· Click: OK. The new WindowsCalendar folder is added to the Windows tree in the left pane.
Step 5
· Click new folder: "WindowsCalendar" in the Windows tree to highlight --> Right click again to open menu.
· Select: Import Task --> Browse to where you have saved the "Reminders - .XML" file.
· Click: "Reminders - .XML" file to import it. If a message appears saying: "The format of the task is not valid" it means you have not changed the computer and user names correctly.
· In bottom of new window that appears, open: Drop down menu --> Select: Windows 7 --> Click: OK.
Step 6
Open and run the regedit file WinCalEdit.zip attached here WinCalEdit.zip. This enables Windows Calendar to open in the desktop WinMail.exe interface.


