
When organizing your home network it’s easier to assign each computer it’s own IP address than using DHCP. We can assign static IP address in any operating systems like Windows XP, Vista , and Windows 7.
If you have a home network with several computes and devices, it’s a good idea to assign each of them a specific address. If you use DHCP (Dynamic Host Configuration Protocol), each computer will request and be assigned an address every time it’s booted up. When you have to do troubleshooting on your network, it’s annoying going to each machine to figure out what IP they have.
Using Static IPs prevents address conflicts between devices and allows you to manage them more easily. Assigning IPs to Windows 7 is essentially the same process, but getting to where you need to be varies between each version.
To change the computer’s IP address in Windows 7, type network and sharing into the Search box in the Start Menu and select Network and Sharing Center

Then when the Network and Sharing Center

Right-click on your local adapter and select Properties.

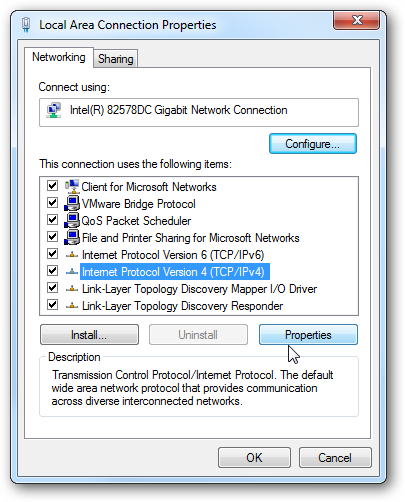
In the Local Area Connection Properties window highlight Internet Protocol Version 4 (TCP/IPv4) then click the Properties button.
Now select the radio button Use the following IP address and enter in the correct IP, Subnet mask, and Default gateway that corresponds with your network setup. Then enter your Preferred and Alternate DNS server addresses. Here we’re on a home network and using a simple Class C network configuration and Google DNS.
Check Validate settings upon exit so Windows 7 can find any problems with the addresses you entered. When you’re finished click OK.

Now close out of the Local Area Connections Properties window.

Windows 7 will run network diagnostics and verify the connection is good. Here we had no problems with it, but if you did, you could run the network troubleshooting wizard.

Now you can open the command prompt and do an ipconfig to see the network adapter settings have been successfully changed.


